2021.04.27 - [Programming/Tips] - [Arm64] M1 맥북에 tensorflow 2.4 설치하기 (conda 환경)
지난 포스팅에서 M1 맥북에어에 tensorflow 2.4를 설치하는 방법을 정리해 보았다.
그리고 최근에 한 단계 버전업 된 tensorflow 2.5가 배포된 것을 보고 설치해 보았다. 실제 설치를 해 보니 2.4보다 절차가 훨씬 간결하고 쉬워진 것을 발견했다. 무엇보다도 이번 버전의 놀라운 점은 tensorflow-metal이라는 plugin 설치를 통해 M1 맥북의 GPU를 사용할 수 있게 되었다는 것이다. 이미 이전 버전에서 Rosetta 없이 native M1 머신러닝을 할 수 있게 되었다는 것에 더해, 이번 버전을 통해 M1 GPU를 사용할 수 있게 됨으로써 머신러닝시 런타임의 큰 감소가 기대되는 바이다.
그래서 실제 GPU에서는 얼마나 빨라지는 확인해 보았다.
아래의 여섯 단계로 tensorflow 2.5 설치와 GPU에서 tensorflow를 실행해 볼 수 있다.
런타임의 비교를 위해 tensorflow 2.5 설치와 테스트를 한 맥북의 사양을 확인해보자.

Step 1: Xcode command line tools 설치하기
xcode-select --install
Step 2: Miniforge 설치하기
아래의 링크에서 Miniforge를 설치한다.
https://developer.apple.com/metal/tensorflow-plugin/
Metal - Apple Developer
Find presentations, documentation, sample code, and resources for building macOS, iOS, and tvOS apps with the Metal framework.
developer.apple.com
위 링크에서 아래와 같이 서브링크에서 miniforge3을 바로 다운받을 수 있다.

다음과 같이 실행한다.
chmod +x ~/Downloads/Miniforge3-MacOSX-arm64.sh
sh ~/Downloads/Miniforge3-MacOSX-arm64.sh
source ~/miniforge3/bin/activate
참고로 tensorflow 2.4를 사용하고 있었다면 이전 miniforge와 버전이 다르기 때문에 기존의 conda 환경은 모두 삭제하고 진행해야 한다. 그렇지 않으면 numpy의 버전 충돌로 tensorflow 뿐만 아니라 관련된 모든 라이브러리를 사용할 수 없게 된다. miniforge conda의 삭제는 아래의 링크를 참고한다
How to uninstall mini conda? python
Step 3: Conda를 이용해 가상환경 만들기
miniforge3 설치가 끝나고 가상환경을 만든다. 이름은 tf25로 하였고 각자 원하는 이름으로 바꿀 수 있다.
conda create --name tf25 python=3.8
가상 환경이 생성 되었고 activate로 환경 전환을 해준다.
conda activate tf25
base -> tf25로 전환이 됐다.

Step 4: Tensorflow-MacOS 설치하기
tensorflow의 의존성을 설치한다.
conda install -c apple tensorflow-deps
tensorflow의 본 패키지를 설치한다.
pip install tensorflow-macos
metal 플러그인을 설치한다
pip install tensorflow-metal
Step 5: 주피터 노트북과 주요 라이브러리 설치
다음으로 주요 라이브러리들을 설치한다. 아래는 pandas와 jupyter notebook 설치를 보여준다.
conda install -c conda-forge -y pandas jupyter
참고로 scikit-learn이나 matplotlib와 같은 주요 라이브러리도 위와 같이 설치해 줄 수 있다.
Step 6: MNIST dataset으로 모델 훈련해보기
먼저 Tensorflow에서 제공하는 dataset을 이용하기 위해 다음과 같이 실행해주자
pip install tensorflow_datasets
주피터 노트북을 실행해 새로운 python3 notebook을 만들어 보자
jupyter notebook
새로 만든 노트북에서 Tensorflow를 import 하여 설치가 잘 되었는지를 확인한다.
import tensorflow as tf
첫 import는 약간 시간이 걸리며, 아래와 같은 메세지를 출력한다.

다음으로 GPU의 감지 여부와 사용가능한 GPU의 개수를 확인해 본다.
print("Num GPUs Available: ", len(tf.config.experimental.list_physical_devices('GPU')))
한 개의 사용가능한 GPU가 있다는 메시지를 낸다.

이로써 모든 준비가 끝났다. 이제 M1 맥북의 GPU에서 Tensorflow를 이용해 모델을 훈련해보고 시간을 비교해 보자.
참고 링크에 나온 코드를 그대로 사용해보자. 아래의 코드를 주피터 노트북의 code cell에 붙여 넣고 실행해보자.
%%time
import tensorflow.compat.v2 as tf
import tensorflow_datasets as tfds

tf.enable_v2_behavior()

from tensorflow.python.framework.ops import disable_eager_execution
disable_eager_execution()


(ds_train, ds_test), ds_info = tfds.load(
    'mnist',
    split=['train', 'test'],
    shuffle_files=True,
    as_supervised=True,
    with_info=True,
)

def normalize_img(image, label):
  """Normalizes images: `uint8` -> `float32`."""
  return tf.cast(image, tf.float32) / 255., label

batch_size = 128

ds_train = ds_train.map(
    normalize_img, num_parallel_calls=tf.data.experimental.AUTOTUNE)
ds_train = ds_train.cache()
ds_train = ds_train.shuffle(ds_info.splits['train'].num_examples)
ds_train = ds_train.batch(batch_size)
ds_train = ds_train.prefetch(tf.data.experimental.AUTOTUNE)


ds_test = ds_test.map(
    normalize_img, num_parallel_calls=tf.data.experimental.AUTOTUNE)
ds_test = ds_test.batch(batch_size)
ds_test = ds_test.cache()
ds_test = ds_test.prefetch(tf.data.experimental.AUTOTUNE)


model = tf.keras.models.Sequential([
  tf.keras.layers.Conv2D(32, kernel_size=(3, 3),
                 activation='relu'),
  tf.keras.layers.Conv2D(64, kernel_size=(3, 3),
                 activation='relu'),
  tf.keras.layers.MaxPooling2D(pool_size=(2, 2)),
#   tf.keras.layers.Dropout(0.25),
  tf.keras.layers.Flatten(),
  tf.keras.layers.Dense(128, activation='relu'),
#   tf.keras.layers.Dropout(0.5),
  tf.keras.layers.Dense(10, activation='softmax')
])
model.compile(
    loss='sparse_categorical_crossentropy',
    optimizer=tf.keras.optimizers.Adam(0.001),
    metrics=['accuracy'],
)

model.fit(
    ds_train,
    epochs=12,
    validation_data=ds_test,
)
실행하면 아래와 같이 M1으로 Metal device가 세팅 되었다는 메세지가 나온다.

그리고 훈련이 시작된다. 많은 경고 메세지가 나오지만 무시한다.

훈련이 진행되는 동안 Activity Monitor를 열고 GPU를 사용하고 있는지를 확인한다. 90% 이상의 로드로 계산이 진행되고 있다고 나온다. 드디어 M1 맥북의 로컬 GPU에서 tensorflow를 실행할 수 있게 되었다.

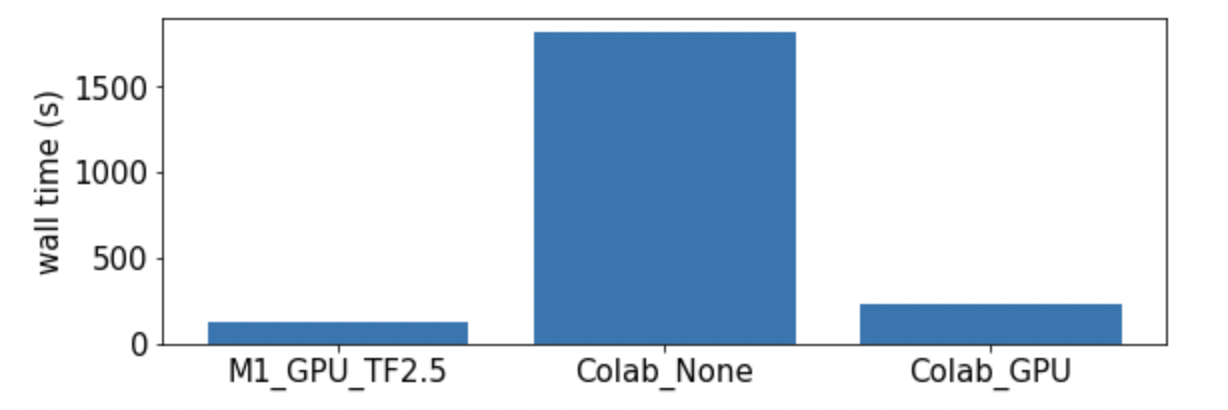
훈련이 끝났다. 128의 batch size로 12 epoch로 실행했고, 걸린 시간은 2분 9초로 나온다.

Wall time on Colab
같은 코드로 Colab에서 두 가지 Hardware accelerator 설정으로 테스트해 본다.
Hardware accelerator : None


Hardware accelerator : GPU


마치며
세 결과를 비교하니 M1 GPU가 colab의 GPU보다는 두 배, hardware accelerator 없는 경우보다는 15배 정도 빠른 것으로 나왔다. 놀라운 결과이다. 이제 tensorflow를 M1 GPU에서 실행할 수 있게 되었다.

참고한 링크
- How To Install TensorFlow on M1 Mac (The Easy Way)
- developer.apple.com: Getting Started with tensorflow-metal PluggableDevice
'Programming > Tips' 카테고리의 다른 글
| M1 맥북에 native PyTorch 설치하기 (conda 환경) (0) | 2021.10.16 |
|---|---|
| [matplotlib] plt.boxplot 박스색 바꾸기 (0) | 2021.06.05 |
| [Jupyter notebook] Table of Contents (TOC) 넣기 (상단/사이드 배치) (2) | 2021.05.30 |
| [Arm64] M1 맥북에 tensorflow 2.4 설치하기 (conda 환경) (1) | 2021.04.27 |
| [Jupyter notebook] 코드 접기 (codefolding) 설정하기 (0) | 2021.04.19 |


댓글